Italiano
 Inglese
Hibernate è un potente framework java-based usato per l’implementazione ORM (Object Relational Mapping) dello strato di persistenza di applicazioni web. In questo articolo viene effettuata una configurazione minimale all’interno di un contesto web Struts MVC . Si supppone di avere già creato un progetto web dinamico all’interno dell’IDE di sviluppo Eclipse (vedere qui). Il sistema RDMBS utilizzato sarà Mysql. Vediamo i passi principali per la configurazione di hibernate all’interno del progetto.
STEP 1.
Creare il DB schema:
$ mysql -uroot -proot
mysql> create database demodb;
STEP 2.
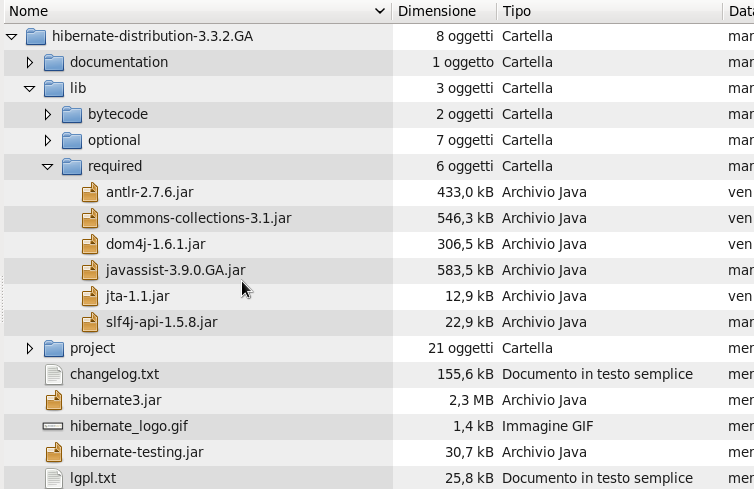
Scaricare e scompattare Hibernate 3.3.2: http://sourceforge.net/projects/hibernate/files/hibernate3/
STEP 3.
Copiare le seguenti librerie nella directory di progetto WebContent/WEB-INF/lib :
- antlr-*.jar
- commons-collections-*.jar
- dom4j-*.jar
- jta-*.jar
- javassist-*.jar
- slf4j-api-*.jar
- slf4j-jcl-*.jar
- hibernate*.jar
STEP 4.
Scaricare il driver connector Mysql JDBC e copiarlo nella directory lib del progetto: http://dev.mysql.com/downloads/connector/j/
STEP 5.
Creare il file di configurazione hibernate.cfg.xml nella directory “src” del progetto:
<?xml version='1.0' encoding='utf-8'?>
<!DOCTYPE hibernate-configuration PUBLIC
"-//Hibernate/Hibernate Configuration DTD 3.0//EN"
"http://hibernate.sourceforge.net/hibernate-configuration-3.0.dtd">
<hibernate-configuration>
<session-factory>
<property name="connection.driver_class">com.mysql.jdbc.Driver</property>
<property name="connection.url">jdbc:mysql://localhost/demodb</property>
<property name="connection.username">root</property>
<property name="connection.password">root</property>
<property name="dialect">org.hibernate.dialect.HSQLDialect</property>
<property name="current_session_context_class">thread</property>
<property name="connection.pool_size">1</property>
</session-factory>
</hibernate-configuration>
STEP 6.
Creare una classe di utilità per la SessionFactory di hibernate:
package com.demo.hibernate;

import org.hibernate.*;
import org.hibernate.cfg.*;

public class SessionUtil {
private static final SessionFactory sessionFactory;
static {
try {
// Create the SessionFactory from hibernate.cfg.xml
sessionFactory = new Configuration().configure().buildSessionFactory();
} catch (Throwable ex) {
// Make sure you log the exception, as it might be swallowed
System.err.println("Initial SessionFactory creation failed." + ex);
throw new ExceptionInInitializerError(ex);
}
}
public static SessionFactory getSessionFactory() {
return sessionFactory;
}
}
STEP 7.
Creare un filtro per il check della SessionFactory di hibernate:
package com.demo.hibernate;
import java.io.IOException;
import javax.servlet.Filter;
import javax.servlet.FilterChain;
import javax.servlet.FilterConfig;
import javax.servlet.ServletException;
import javax.servlet.ServletRequest;
import javax.servlet.ServletResponse;
import org.hibernate.SessionFactory;
import org.hibernate.StaleObjectStateException;

public class SessionRequestFilter implements Filter {

private SessionFactory sf;

public void doFilter(ServletRequest request,
ServletResponse response,
FilterChain chain)
throws IOException, ServletException {
try {
sf.getCurrentSession().beginTransaction();
chain.doFilter(request, response);
sf.getCurrentSession().getTransaction().commit();
} catch (StaleObjectStateException staleEx) {
throw staleEx;
} catch (Throwable ex) {
// Rollback only
ex.printStackTrace();
try {
if (sf.getCurrentSession().getTransaction().isActive()) {
sf.getCurrentSession().getTransaction().rollback();
}
} catch (Throwable rbEx) {
System.out.print(rbEx.getStackTrace());
}
throw new ServletException(ex);
}
}

public void init(FilterConfig filterConfig) throws ServletException {
sf = SessionUtil.getSessionFactory();
}

public void destroy() {}

}
STEP 8.
Dichiarare il filtro nel file web.xml :
<!-- Filter Configuration -->
<filter>
<filter-name>HibernateSessionFilter</filter-name>
<filter-class>com.demo.hibernate.SessionRequestFilter</filter-class>
</filter>

<filter-mapping>
<filter-name>HibernateSessionFilter</filter-name>
<url-pattern>/*</url-pattern>
</filter-mapping>
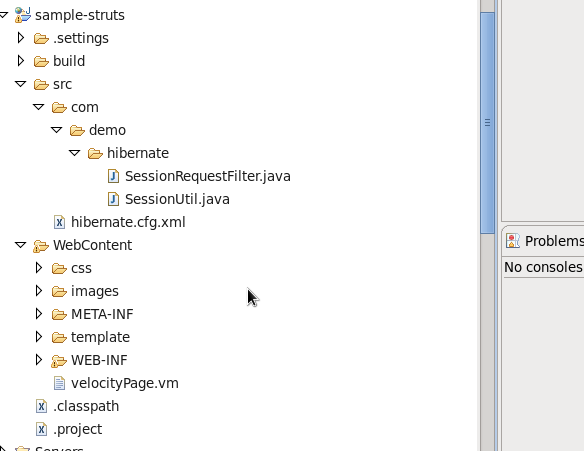
Ecco come si presenta il layout di progetto:
STEP 9.
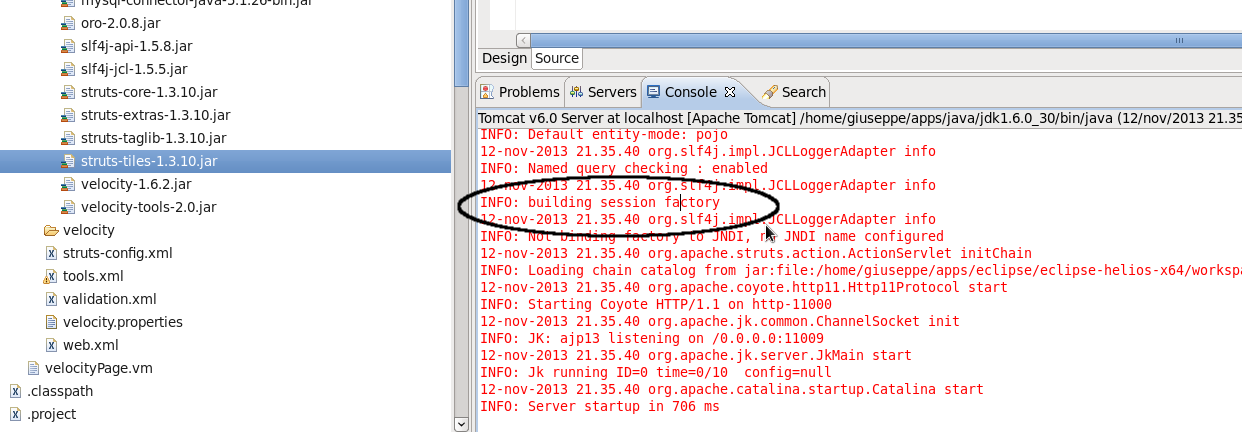
Avviare Tomcat in Eclipse e verificare che la session factory sia creata senza errori: